
Details
Last Updated: 17 May 2017
The Details screen of an asset allows you change various details including the name of the asset and its Status.
The functionality described on this page is generic functionality that applies to majority of the asset types in Squiz Matrix. Some asset types will have additional functionality on their Details screen, and some will have less. Please refer to each asset type's manual to read about its specific Details screen functionality.
Status
This section shows the current Status of the asset and allows you to change its Status.
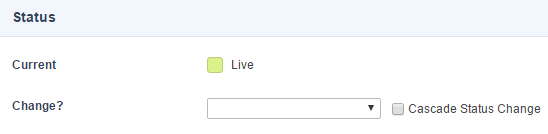
The available fields are:
- Current: This area shows the current status of the asset.
- Change: To change the Status of the asset, select a new status from the select list. The options available depend on the current Status of the asset, what permissions you have and whether or not Workflow is applied. For example, if the asset is currently Under Construction and you have Admin Permission, the available options are Approve and Make Live and Archive. If there is Workflow applied to the asset the options will depend on the Workflow approval stream configuration.
You cannot change the Status of an asset if the current Status is Pending Approval, as that means a Workflow is currently in progress.
You cannot change a dependant asset to a Status lower than that of its parent unless the dependant asset is within Workflow.
- Cascade Status Change: Enable this option to cascade the Status change to all child assets.
You do not need to cascade a Status change in order to change the status of the dependent child assets of the asset. For example, if you change the Status of a Standard Page, its child Page Contents and Content Container assets will also receive the Status change.
Future Status
This section allows you to schedule a Status change for the asset at a date and time in the future. This requires the Scheduled Jobs Manager to be configured on the Squiz Matrix server. If it has not been set up, these fields will not be available.
The available fields are:
- Set Status To: Select the Status you want the change to.
- At: Select the date and time for when the Status change should occur.
- Next Run: Alternatively, click on the Next Run button to set the date and time to the next run of the Scheduled Jobs Manager.
- Or In: Alternatively, you can set the Status change to take place in a certain number of minutes, hours, days, weeks, months or years.
- Cascade Status Change: Enable this to cascade the Status change to all child assets.
Once a Future Status change has been scheduled it will appear in the Scheduled Future Status Changes section.

To delete a Future Status job, check the delete checkbox and click Save.
Thumbnail
This section allows you to assign a thumbnail, or related image, to the asset. This thumbnail can be used as content within your site. For example, you can set up an Asset Listing page to display the name and the thumbnail for each page. For more information on the Asset Listing page, refer to the Asset Listing manual.
The available fields are:
- Current: If there is an image assigned to the asset, this section will display the details of the image including the name and size of the file, when it was last updated and the dimensions of the image. If you click on the Current File link, a preview of the image will appear in a new window.
- Change? : This field allows you to assign a new image asset to the asset.
Details
This section allows you to change the name of the asset.
The available fields are:
- Page Name: By default, the name that was entered when the asset was first created will appear in this field. The Page Name is often used for things like the page title of the current page on the front-end.
- Page Short Name: By default, the name that was entered when the asset was first created will appear in this field. The Page Short Name is shown in the Asset Map and can be different to the Page Name. The Page Short Name is often used in navigation menus and breacrumb trails on the front-end.
Cascading a Live Status
Sometimes you might want to cascade a status of Live down to all children of an asset.
If you are changing the status of an asset to Live, and tick Cascade, the Live status will not be applied to any child assets that are in a status of Safe Edit or Safe Edit Pending Approval. This is to make sure that no unintended cancelling of Safe Edit changes are made to any child asset.
Likewise, if you cancel a Safe Edit status on an asset and tick Cascade, the asset and its children will be set to Live. However, it will not affect any child assets in Safe Edit.
The same rules apply if you are setting a Future Status.