
Squiz Matrix Concepts
Last Updated: 29 Jan 2021
In this chapter, we will discuss the basic concepts used within Squiz Matrix. It is important to understand these concepts and the names used to describe them before further learning how to use Squiz Matrix.
Design, Menu and Content

Design, Menu and Concept
When a web user arrives at your Site, they will be viewing pages created within the Squiz Matrix system. Squiz Matrix uses the three components of Design, Dynamic Menu Navigation, and Content to create each of these pages.
Design
This is the component that dictates where the fixed design elements (e.g. colours, logos and style sheets), navigation menus and content area appear on each page of a website. This is sometimes referred to as the skin or look and feel of a website.
Creating new designs requires knowledge and experience using HTML and CSS and a good understanding of Squiz Matrix. For more information on creating designs, refer to the Designs manual. For the purposes of this document, it is assumed that suitable designs have already been created and uploaded into your system.
Dynamic Menu Navigation
The menu allows users to navigate and view the pages of a site. A site's menu is dynamically structured, determined by the content and layout of the site within Squiz Matrix. As pages are renamed and reordered within the system, the site's menu will update accordingly. For more information on how the navigation menu of a Site works, refer to the Site Navigation Menu section of the Using the Asset Map chapter in this manual.
Content
Content refers to all other components of a page including text, images, links etc. You can control the layout and formatting of the content of each page in a Site using the editing interfaces and screens of Squiz Matrix.
Assets
In Squiz Matrix, everything is an asset. Your websites, designs, pages, images and files are all assets within the system. There are many different types of assets in Squiz Matrix; some common examples include:
 Folder
 Image
Image MS Word Document
 PDF File
 Standard Page
The main advantage of an asset based system is the ability to re-use content in multiple locations. For example, an image displayed on one page of a Site can also be re-used in other sections of the Site. Similarly, a paragraph of text on a News page could be re-used in a News section on the Site's Homepage.
Another advantage of an asset based system is that access to the asset can be controlled at the asset level rather than at the Site or page level alone. This has the powerful result of allowing you to control all aspects of user access, right down to the individual sections of a single page. For example, your Homepage can be set up to show additional content if the web user is a logged in to your Site.
The power of this model begins to become clear when you consider that content other than pages are considered assets. For example, it is possible to apply a Workflow or Metadata Schema to assets such as users, images, PDFs or Word documents in addition to standard web pages.
The modular design of assets also means that the system can be easily extended by adding new asset types, otherwise known as custom assets. For example, asset classes can be developed to deal with specific external applications, allowing for far simpler and more powerful integrations.
For more information on how to view and manage the assets in your system, refer to the Using the Asset Map chapter in this manual.
Logging In
You can login to the Squiz Matrix system by appending _login to the URL of an asset, like this:
http://www.example.com/_loginA Login screen will appear, prompting you to enter your username and password.
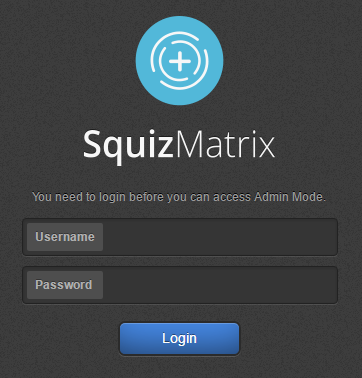
This screen will appear when you attempt to access any Squiz Matrix interface if you are not already logged in.
You can modify the login design of an asset on its Settings screen. For more information, refer to the Settings chapter in the Asset Screens manual.
To log in, enter your username & password and click Login.
Updating Your Password on Login
If a user account has been placed Up For Review (see the Asset Status section below), the Change Password screen will appear when logging into the system.
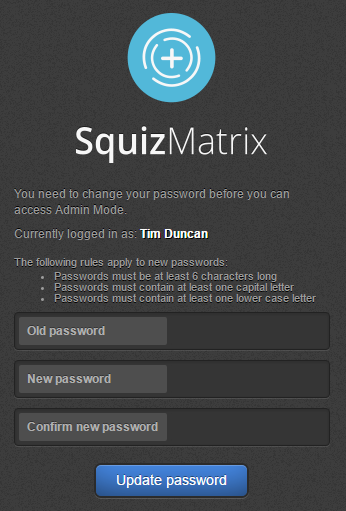
If this screen appears, a user will need to change their password before they can log into the Squiz Matrix system.
To change your password, enter your current password followed by the new password for the user account and click Update Password.
Any password rules that have been configured will also appear on this screen.
For more information, refer to the Updating User Passwords chapter in the User and Permissions manual.
Backup Login
In rare cases, you may not be able to access the Login screen, for example, due to a broken System Defined Login Design. In such cases, you are effectively 'locked out' of the Squiz Matrix system.
If this occurs, you can access the system via a Backup Login, allowing you to log in and correct any problems with your Login screen.
You can access the Backup Login by appending ?SQ_ACTION=login&FORCE_BACKUP_LOGIN=1 to the login URL of an asset, like this:
http://www.example.com/_login/?SQ_ACTION=login&FORCE_BACKUP_LOGIN=1The Backup Login screen will appear, where you can enter your user account details and login to the system.
Logging Out
Whilst logged in to the Admin interface, you can easily log out by clicking on the Log Out button in the top toolbar.
![]()
Alternatively, you can also log out by appending ?SQ_ACTION=logout to the URL and hitting enter, for example:
http://www.example.com/_admin?SQ_ACTION=logoutInterfaces
There are two main interfaces within Squiz Matrix:
- Admin Mode: The central hub of all system functionality.
- Edit Mode: A simple interface for content authors to perform quick and easy content editing
There is also a Performance Mode interface which is a unique performance analysis tool that allows you to monitor and review the performance of all assets that were used to generate a certain page.
Admin Mode
The Admin Mode allows you to use all of the functionality available within the Squiz Matrix system. The amount of functionality that is available to a specific user will depend on the type of user account they have.
You can access Admin Mode by appending _admin to the URL of an asset:
http://www.example.com/site/_admin For more information on the Admin Mode, refer to the Admin Mode chapter in this manual.
Edit Mode
Edit Mode offers a restrictive set of functions, allowing people with little to no Squiz Matrix training to update content on a single asset at a time.
You can access Edit Mode by appending _edit to the URL of an asset:
http://www.example.com/site/_editFor more information on SEdit mode, refer to the Edit Mode chapter in this manual.
Performance Mode
Squiz Matrix's Performance Mode analyses the load time of assets within the system, presenting this information to users through an in-depth timeline chart. This allows users to monitor the performance of their assets and pinpoints problem areas that may be causing excessive load times on pages.
You can access Performance Mode by appending _performance to the URL of an asset:
http://www.example.com/site/_performancePerformance results are displayed at the bottom of the screen and will regenerate as a user navigates through different pages of a site.
For more information on Performance Mode, refer to the Performance Mode chapter in this manual.
User Types
There are five different types of users in Squiz Matrix:
- Public User: These are the people who are browsing the Internet, visiting pages within your Site. In general, members of the public will not have any kind of user account i.e. they will be anonymous when they use your Site. The Public User asset in Squiz Matrix represents these people.
- User: In some cases you may wish to enable access to a 'Members Only' area of your Site. In these cases, you would give that person a User account. A person with a User account will not be able to access either of the editing interfaces within Squiz Matrix.
- Simple Edit User: This user type can log into Squiz Matrix and edit the contents of assets they have access to using Edit Mode.
- Backend User: This user type can log into Squiz Matrix and edit the contents of assets they have access to using both Edit Mode and Admin Mode.
- System Administrator: This user type has access to almost all parts of Squiz Matrix. Because this account is so powerful, only the Root User can create a System Administrator accounts.
- Root User: This user type has access to all parts of Squiz Matrix. There can only be one Root User account for each Squiz Matrix system.
For more information on how to create each type of account and grant different levels of access, refer to the Users & Permissions manual.
Access Privileges and Permissions
The level of access a user has within Squiz Matrix will depend on the type of user account they have.
Public Users and Users are not able to access the editing interfaces within Squiz Matrix. These user accounts can only view the contents of a Site. A User, however, can access additional content on a Site, not available to Public Users (e.g. exclusive member content).
Backend Users, System Administrators, and the system's Root User all have access to all editing interfaces. Backend Users, however, are restricted in the assets that they are able to edit. These restrictions are determined by access permissions set by either a System Administrator or the system's Root User.
System Administrators and the Root User have access to all assets within the system, irrespective of the level of access that has been granted for each asset.
There are three different levels of access per asset:
- Read Permission: If a user has Read Permission for an asset, they are able to view the contents of the asset. Public Users and Users need to have at least Read Permission in order to view Live assets on a Site. For more information on the Live asset status, refer to the Asset Status section in this chapter.
- Write Permission: If a user has Write Permission for an asset, they are able to view and edit the asset. Users with Write Permission can view assets even if they are not Live. They are not allowed, however, to execute some administrative operations, such as make certain Status and Permission changes and applying Workflow or Metadata Schemas. A Backend User needs to have at least Write Permission for an asset in order to edit it.
- Admin Permission: If a user has Admin Permission for an asset, they are considered an administrator of that asset. They are able to perform all tasks on that asset, including editing its content, changing its Status and Permissions, and applying Workflow or Metadata Schemas. If a Backend User is a trusted user of the system, they can be given Admin Permission to an asset, allowing them to perform all administrative tasks without the help of a System Administrator. System Administrators and the system's Root User are automatically given this level of access to all assets in the system.
Locking an Asset
Squiz Matrix requires editors to lock an asset before they can make any changes to it. This lock prevents more than one person editing an asset at the same time and allows other users to see who is currently editing an asset.
Sometimes, however, you do not need to lock the entire asset to edit it. For example, a user can be changing the name of an asset while another is changing the metadata for that same asset. Neither users will be affected by each other's lock.
Locking an asset is a temporary notice to other users that you are working on a specific piece of content. When locks are released, the content becomes available to others again.
Locks can be released in a number of ways:
- Automatically, after a pre-set period of time if you begin editing another asset in the system. By default, this period of time is set to 10 minutes.
- After you save your changes on some asset types.
- Manually, if you click the Release Locks button.
- By a System Administrator or Root User who has the ability to steal locks from a Backend User.
For more information on how to lock an asset, refer to the Acquire Locks and Release Locks sections of the Admin Mode chapter in this manual.
Saving Your Changes
The Save button must be clicked to save the changes made on a screen before navigating to other screens or assets in the system. By default, this button appears at the bottom of the screen. A warning message will be displayed if a user tries to leave the screen without saving the changes first.
For more information on the Save button, refer to the Save section of the Admin Mode chapter in this manual.
Asset Status
Squiz Matrix allows users to separate incomplete or up for review content from which is completed and approved content. This separation is managed by setting assets within the system to a specific Status.
New assets that have been added to the system are considered incomplete or in a draft. The Status of new assets is automatically set to Under Construction. Once an asset is ready to be published, its Status can be changed to Live, meaning that the asset and its content will be viewable by users with Read Permission to it.
There are six different Statuses that are available. The Status an asset can be changed to is dependent upon the current Status of the asset and the level of access the user has.
For example, a user with Admin Permission is able to change the Status of an asset from Under Construction to Live, while a user who only has Write Permission would not be able to do this.
The Status flow of an asset and the user Permissions required for setting a specific Status are shown in the diagram below.

Under Construction
When an asset is first created, it has a Status of Under Construction. This means that the content is still being added to the asset and it has not yet been approved for publication. An asset with this Status can only be seen by users with Write or Admin Permission to it. Assets that are Under Construction will not appear as part of the content of public Site.
Live
When an asset is Live, it has been through the approval process and has been cleared for publication on the Site. The users who can see the asset will still depend on what Permissions have been granted to that asset. A user with Write or Admin Permission can edit a Live asset.
For an asset to be visible on the public Site, its Status needs to be Live and Read Permission needs to be granted to the Public User.
Safe Edit
This Status allows you to make changes to a Live asset without the changes being seen in the Site until they have been approved. Essentially, Safe Edit will leave the Live version of the asset displayed on a Site for users with Read Permission to it, while making a second copy for you to edit at your leisure.
Using safe edit to edit Live assets in Matrix 5 from Squiz on Vimeo.
If the Safe Edit version of the asset is made Live, the previous Live version is replaced with the newer version.
Safe Edit can be cancelled during the editing process, discarding any changes and reverting the asset back to its previous Live version. To cancel Safe Edit, select Cancel Safe Edit on the Status section of the Details screen of the asset.
Write Permission is needed to view the differences between the contents of the Live version of the asset and the Safe Edit version when Previewing the asset with Compare Changes turned on.
Admin Permission is needed to change the Status of an asset from Safe Edit to Live, while at least Write Permission is needed to cancel the Safe Edit.
Safe Edit Approved
When an asset is Safe Edit Approved, the changes that have been made to the asset while in Safe Edit have been reviewed and are ready to be published.
Please note that a user with Admin Permission can still reject the Safe Edit changes made to the asset at this time. If this happens, the Status of the asset reverts back to Safe Edit, with the Safe Edit changes preserved for further editing.
To reject the approval, select Reject Changes in the Status section of the Details screen of the asset.
Up For Review
The Up for Review Status is used to review the content of the asset. An asset can be scheduled to change its Status to Up For Review at a particular date and time, to remind users to review and update its content.
For example, an asset can change its Status to Up for Review every six months so users will check and ensure that its content is correct and up to date. For more information on changing the Status of an asset at a particular date and time, refer to the Details Screen chapter in the Asset Screens manual.
To make changes to an asset that is Up for Review, you need to change its Status to Safe Edit. If no changes need to be made, you can change the Status to Live. You can also choose to archive an asset that is Up for Review by changing its Status to Archived.
Archived
When an asset is Archived, it is not visible to any users that have Read Permissions to it and changes can no longer be made to the asset. You would use this Status if you wanted to keep the asset for future reference. For example, if the asset is a job application form, you might need to keep the asset until you have processed all of the applications.
Workflow
Workflow is an approval process where one or more people will check the changes that have been made to an asset before it is made Live.
When Workflow is applied to an asset you will not be able to edit the asset if its Status is Live. To edit an asset, you need to change its Status to Safe Edit. Once you have finished editing an asset, you can start the approval process by selecting Apply for Approval in the Status field on the Details screen of the asset.
The Status flow of an asset with Workflow applied and the user Permissions required for changing the Status of that asset are shown in the diagram below.

Status flow chart with Workflow
Three new Statuses are introduced with Workflow:
- Pending Approval
- Approved
- Safe Edit Pending Approval
Pending Approval and Safe Edit Pending Approval indicate that the Workflow for this asset is currently running. Once Workflow has been completed, the Status of the asset will change to Approved or Safe Edit Approved.
Workflow is also utilised when an asset's Status is set to Up For Review. Only users who are a part of the approval process or who have Admin Permission will be able to approve or change the Status of an asset to Safe Edit.
At any stage during Workflow, the changes up for approval can be rejected. If this happens, the Status of the asset reverts back to its previous Status, with all changes preserved for further editing. For example, if the Status of the asset was Safe Edit, it will return to Safe Edit.
For more information on Workflow, refer to the Workflow Schemas manual.
Status Colours and Values
The Statuses available in Squiz Matrix are allocated numeric values for use in system configurations (e.g. webservices and designs). Each Status is also assigned a colour, allowing you to quickly identify the Statuses of assets in the Asset Map.
The Asset Map's Show Status Colours ![]() button allows you to view the current Status of each asset in the Asset Map.
button allows you to view the current Status of each asset in the Asset Map.
These Status values and colours are outlined in the table below.
| Asset Status | Value | Colour |
|---|---|---|
| Archive | 1 | |
| Under Construction | 2 | |
| Pending Approval | 4 | |
| Approved | 8 | |
| Live | 16 | |
| Up For Review | 32 | |
| Safe Edit | 64 | |
| Safe Edit Pending Approval | 128 | |
| Safe Edit Approved | 256 |
Version Control
Squiz Matrix keeps version numbers for every asset in the system. Version numbers are displayed in the following format:
Major.Minor.Micro
For example, 1.3.6.
- Major: The major version number must be manually updated. If you wish to tag an asset as version 1.0.0., you can tick the appropriate box on the Settings screen. For example, if you update the major version number of version 0.1.5 of an asset, the version number becomes 1.0.0.
- Minor: The minor version number is automatically updated each time you change the Status of an asset to Live. For example, if version 0.0.4 of an asset is made Live, its version number automatically becomes 0.1.0.
- Micro: The micro version number is automatically updated when you save any change to an asset. For example, if version 0.0.3 of an asset is edited, when you save your change, its version number becomes 0.0.4.
For more information on version control, refer to the Asset Screens manual.
Rollback
This feature has been deprecated as of version 5.5.0.0. For more information, please view the Deprecations page.
Rollback allows you to view previous versions of assets within your system.
When Rollback is enabled on your system, each asset's History screen will display a list of version changes on that specific asset. These previous versions can then be previewed in Rollback Mode, essentially viewing the system as it was at a specific point in time.
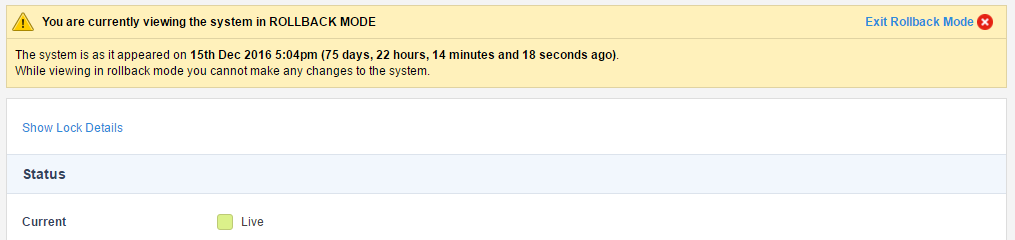
While the information viewed in Rollback Mode cannot be edited, you can preview the front-end HTML content of your assets, copy it and paste it into the contents of an asset once you have exited Rollback Mode.
When electing whether or not to use Squiz Matrix's Rollback functionality, please consider the following:
- The Rollback process requires multiple additional database transactions for each administration action. It is recommended that a system administrator evaluates your system for potential performance issues before enabling Rollback.
- Rollback requires sufficient disk storage space for its logs. These tables will also need regular maintenance to preserve system performance.
- Versioning data will only exist from when Rollback is enabled in your system. In addition to this, users will only be able to see Rollback information from when their account was first created.
Rollback data can be maintained through Squiz Matrix's Rollback Management Tool. For more information, visit the Rollback Management Tool chapter in the Tools manual.
For information on how to enable Rollback, visit the Rollback Management Script chapter in the Server Administrator manual.
HIPO Jobs
A HIPO (Highly Intensive Processing Object) Job is a process that starts every time a task is performed by a user where operations need to be performed on multiple objects to complete the action.
For example, cascading a Status change down all the children of an asset involves processing the Status change action on multiple assets.

HIPO Jobs can be managed through the HIPO Herder. For more information on the HIPO Herder, refer to the HIPO Herder chapter in this manual.