
Site
Last Updated: 08 Feb 2017
Before you can start building your web site, you need to add a Site asset. Once you create a Site, you can start building your web site by adding the required assets underneath it. You can add as many Site assets as you want to your system.
Only a System Administrator or the Root User can add a Site at the top level in the Asset Map.
Details Screen
The Details screen for a Site allows you to change the name of the Site as well as apply an Index and Not Found page.
Details
- Site Name: The name of the Website.
Special Page Links
This section allows you to configure the various assets to use the contents of for various special site pages.
- Index: Select an asset to use as the home page of the Site. This will be the first page the user will see when they enter the URL of the Site.
If you try to delete a page that has been set as the Index Page for your Site, you will be notified that it is the Index Page and will be prompted to confirm the deletion of that asset.
- Not Found: Select an asset that will be displayed when a user views an invalid URL. The site will use this asset as the contents for the Page Not Found (404) page.
- Archived Asset: Select an asset that will be displayed if a user tries to view an Archived asset that they do not have Read Permission to. If selected, the contents of this asset will be shown instead of a login screen.
Not Found Page Options
This section allows you to configure the layout of the Not Found page, specified in the Special Page Links section.
- Override Design: Select a Design (or Design Customisation) to use for the Not Found page. If no Design is selected in this field, the Not Found page will use the Design based on the closest matching valid URL.
- Override Paint Layout: Select a Paint Layout to use for the Not Found page. If no Paint Layout is selected in this field, the Not Found page will use the Paint Layout based on the closest matching valid URL.
- Cache Globally: Select whether to globally cache the Not Found page. When this option is enabled, the Not Found page will share a common cache entry everywhere it is used, irrespective of the URL.
This should only be used on Sites where the configured Not Found page is constant and not dynamically generated by URL.
By default, this field is set to No.
URLs Screen
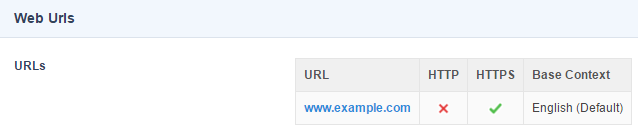
Web URLs
This section allows you to assign URLs (domains) to the Site.
By default, no URL is assigned. To assign a URL, enter it into the URLs field, select either HTTP or HTTPS and click Save. The URL will be applied to the Site and any child assets that have been created underneath it. You can assign as many URLs as you want to a Site.
If you select HTTPS, your sever must be configured with an SSL certificate to support secure access. Also, if Force Secure is set on the Settings screen of the Site, selecting HTTP will have no effect. Any URL that you apply to a Site must be appear in the field System Root URLs on the System Configuration screen. If it does not appear in this field, Squiz Matrix will not apply the URL and you will receive an error message similar to URL example.com.au is not based upon an existing System Root URL. For more information on the System Configuration screen,refer to the System Configuration manual.
You can use a domain name as well as a sub path of a domain as the URL for your site. This can be useful when using Contexts for example, when you want to have different URL versions of your site for different languages.
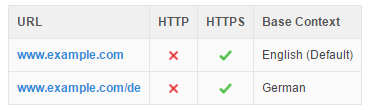
Base Context
For each URL you add to a Site, you can set a Base Context. This is only applicable if you are using Contexts in your system.
The Base Context URL is used to determine what Context to switch into by default when logging in to Admin or Edit mode. For example, if I have a URL of www.example.com/de which is using a Context called German and I login to Matrix using www.example.com/de/_admin, I will automatically activate the German context for my Matrix interface.
For more information, refer to the Context manual.
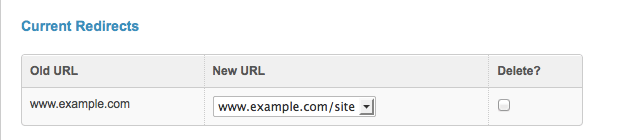
Authentication Redirects
This section allows you, as an alternative to displaying a login box, to create a redirect from one URL to another in an attempt to be authenticated by some external mechanism.
If the second URL provides some form of HTTP-based or other external authentication (whether by the web server itself, or by a proxy server, or by other means), then this may be useful to you. The redirection will continue in a chain (eg. a set up of URL A => B, B => C will redirect first to B, and then to C unless authentication occurred at URL B). If you are taken to a URL in the chain with no redirect defined, you will then receive a login box if still not authenticated.
To set up a redirect, select the first URL in the From field, the second URL in the To field and click Commit. The redirect will appear in the Current Redirects section, as shown in the example below.
Setting Up a Site
Once you have created a Site asset, you will need to:
- Apply a URL to the Site, for example www.example.com.
- Set the Index Page (homepage) of the Site. This will be the first page that the user will see when they visit the Site.
- Apply a Design to your Site. This Design dictates the look and feel of your Site including where the navigation menu and content of the Site appears.
Applying a URL
To assign a URL to the Site, go to the URLs screen. Enter the URL into the URLs field, select either HTTP or HTTPS and click Save. The URL will be applied to the Site and any child assets that have been created underneath it.
Setting the Index Page
To set the index page or the home page of the Site, go to the Details screen of the Site. Select the asset that will be the index page in the Index Page field.
If you have just added the Site to the Asset Map you may need to create a Standard Page as a child of your Site and assign it as the Index Page.
Applying a Design
To apply a Design to the Site, go to the Settings screen of the Site. Under the System Defined Fronted Design section, select the Design you want to use in the New field. For more information on the Settings screen, refer to the Settings screen chapter in the Asset Screens manual.